pve安装及配置

咸鱼捡垃圾碰巧捡了个华硕B250M主板+Intel i5 7500,碰巧捡了个拓扑龙的8盘位机箱,碰巧捡了个pcie转sata卡,碰巧捡了个益恒250W flex电源,碰巧捡了好几块机械硬盘。折腾一下pve。

主板+CPU+内存条:¥350

机箱:280+54-20-90+118=¥342

PCIE扩展卡:¥35

电源:¥283

Total:¥1010

还没算硬盘,多少有点贵了。不过相比最新的硬件比如N100什么的,还是便宜不少,N100主板+CPU套装一般就600左右了。

PVE

Proxmox VE[1]是一个基于debian的linux发行版,开源的服务器虚拟化平台。

安装PVE

使用ventoy[2]安装,如果ventoy版本是有bug的版本的话,在安装pve的时候有可能会遇到No Device with Valid ISO Found的问题,似乎是ventoy的bug[3],更新到1.0.99版本就行了,但是后面安装好之后,还会有bug,无法启动。表现就是启动的时候会卡在Loading initial ramdisk...,然后又是google一番,发现是pve和ventoy的bug[4]。按照帖子上的说法,编辑/etc/default/grub.d/installer.cfg这个文件,删掉voty参数的部分。我的改完之后是GRUB_CMDLINE_LINUX="$GRUB_CMDLINE_LINUX",然后运行update-grub更新配置文件,然后就可以了。

世界就是一个巨大的bug,为什么这么多bug。

如果显示器显示登录的界面了(只有命令行),就是安装成功了,然后按照命令行的提示,在另一台电脑上访问web界面就可以了。note:必须用https访问,可以直接安装这个证书或者后面自己配置证书。刚好可以用之前openssl自己创建的证书。

配置证书

参考[5]
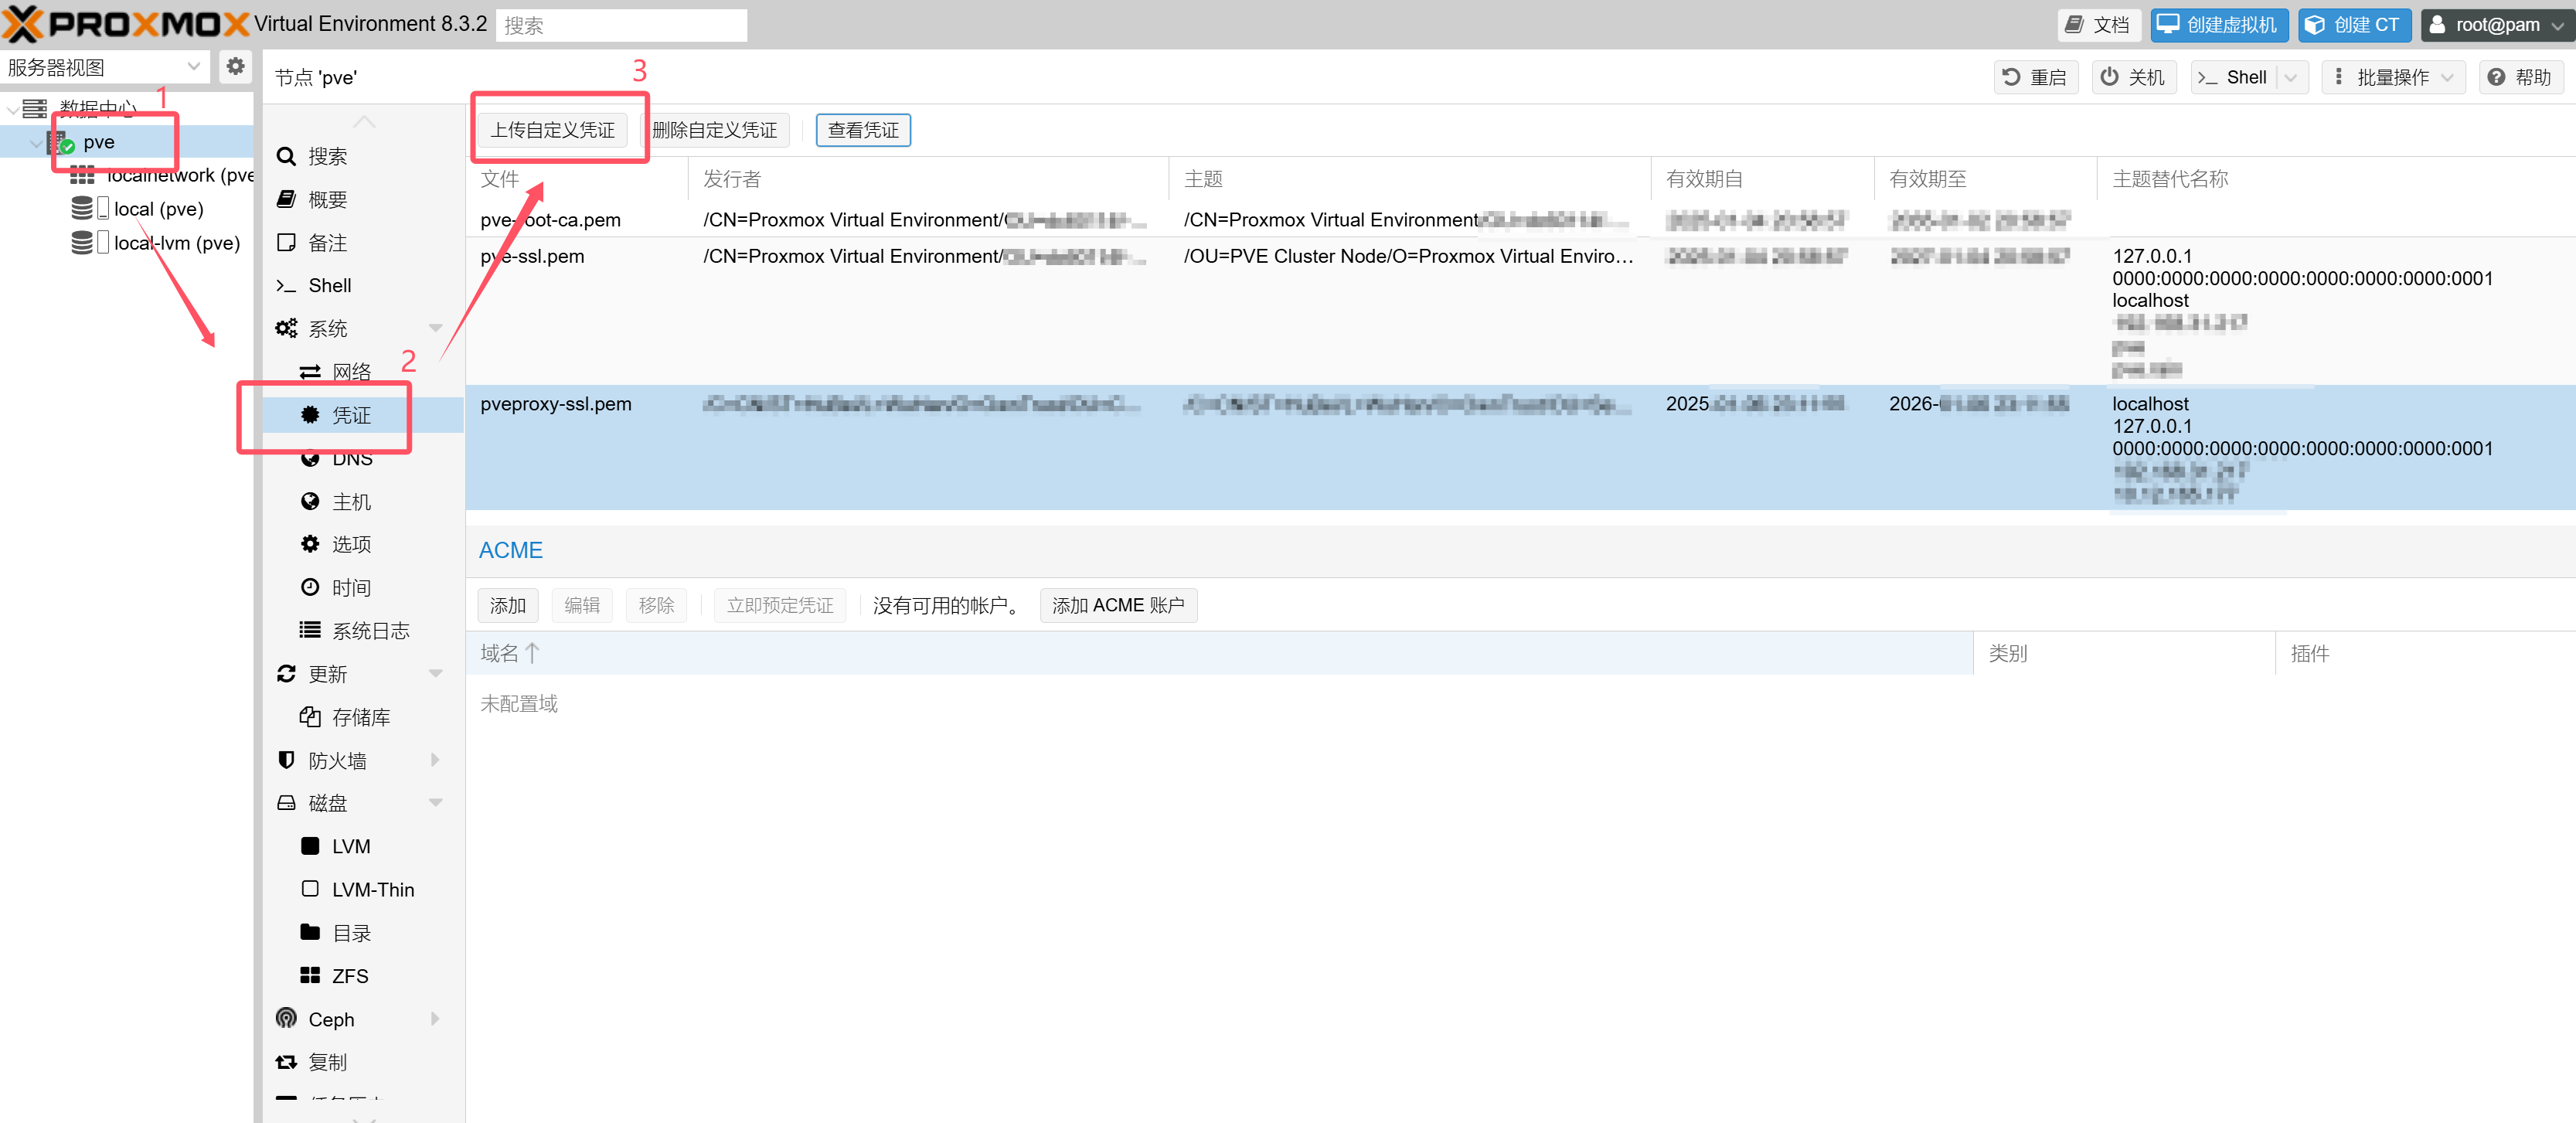
image-20250107202845967

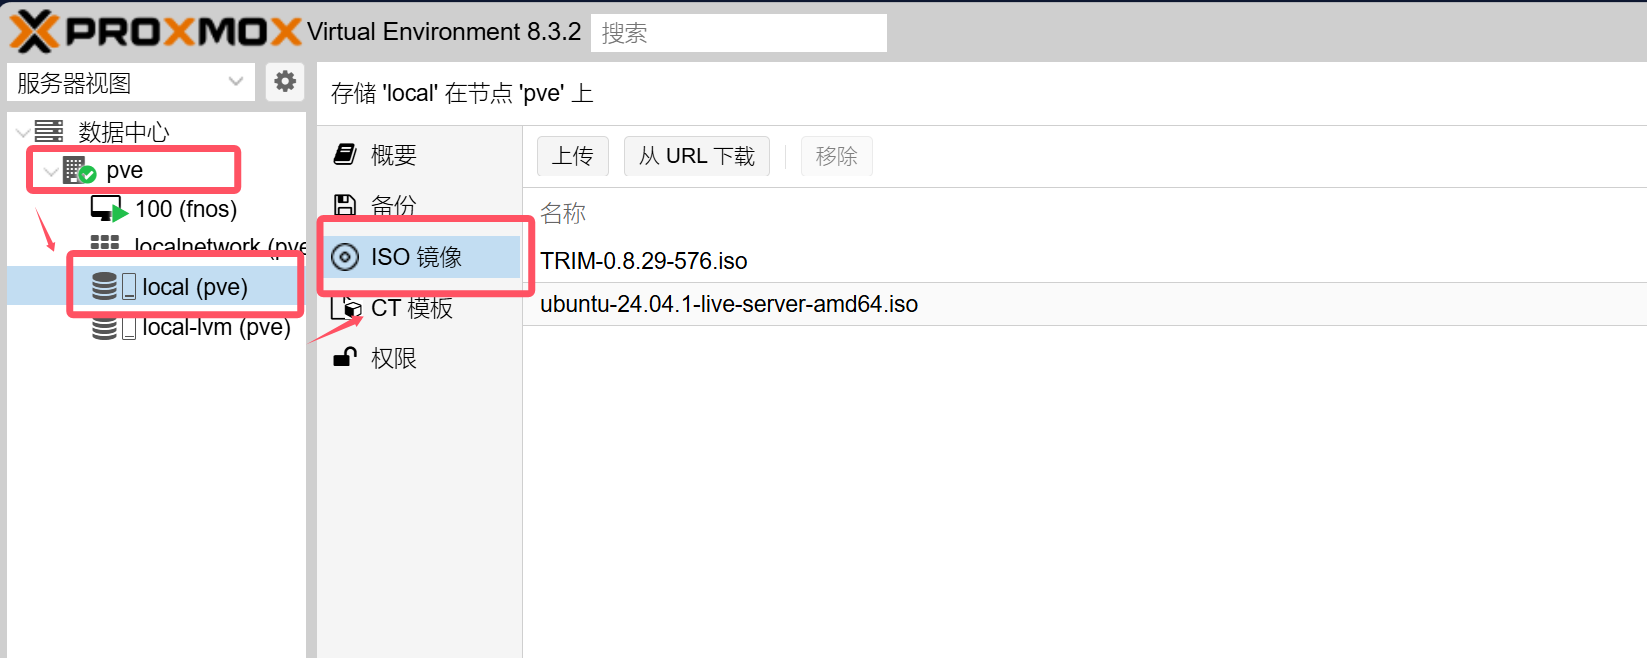
上传镜像

image-20250108194753739

上传的时候可以选择保存的文件名,以及哈希算法验证镜像的完整性。

运行虚拟机/CT

右上角创建虚拟机,旁边还有创建CT的选项,根据查到的资料看,CT是进程隔离的技术,虚拟机是完全虚拟出来的操作系统,虚拟机隔离更彻底,但是资源占用也较大,CT进程隔离资源利用效率更高[6]

先创建个虚拟机试试(创建CT不知道怎么操作)

输入名称,选择ISO镜像,显卡bios什么的保持默认,磁盘除了大小调整一下,其他的也全部保持默认,cpu核心可以选满,因为按照资料[6]说的,核心并不是这个虚拟机独占的,pve会自动根据权重来分配,核心数只是一个性能上限,并且还提到了cpu类型选择host会拥有更好的性能(但是迁移性会变差),不过我也不考虑迁移,就选host。

创建之后直接启动,就会进入到安装ISO的步骤。(如果想安装其他操作系统,也可以关机然后选择其他ISO文件,qm stop id强制关闭具有特定id的虚拟机)

PCI直通

PVE的一个很火的功能,字面意思,PCI设备可以直通到虚拟机,比如显卡或者其他PCIE转接卡。

这个功能需要在主板BIOS中开启VT-d选项(和VT-x不是一个东西)(Intel)华硕的主板中在高级设置->北桥->VT-d,选择enable就可以了。然后按照教程[7]操作

  1. 首先编辑grub配置文件

    1
    2
    3
    4
    5
    # /etc/default/grub
    # intel cpu加上intel_iommu=on
    GRUB_CMDLINE_LINUX_DEFAULT="quiet intel_iommu=on"
    # amd cpu加上amd_iommu=on
    GRUB_CMDLINE_LINUX_DEFAULT="quiet amd_iommu=on"

    然后更新grub

    1
    2
    3
    4
    update-grub
    # 但是忘记在哪看到的教程说pve已经不使用update-grub命令了,需要用:
    pve-efiboot-tool refresh
    # 保险起见两个都运行一遍得了
  2. 然后加载相应的内核模块

    1
    2
    3
    4
    echo vfio >> /etc/modules
    echo vfio_iommu_type1 >> /etc/modules
    echo vfio_pci >> /etc/modules
    echo vfio_virqfd >> /etc/modules

    然后重启pve,然后应该就可以用了。

在虚拟机关机的状态下,选择添加设备,然后就可以PCI设备直通了。
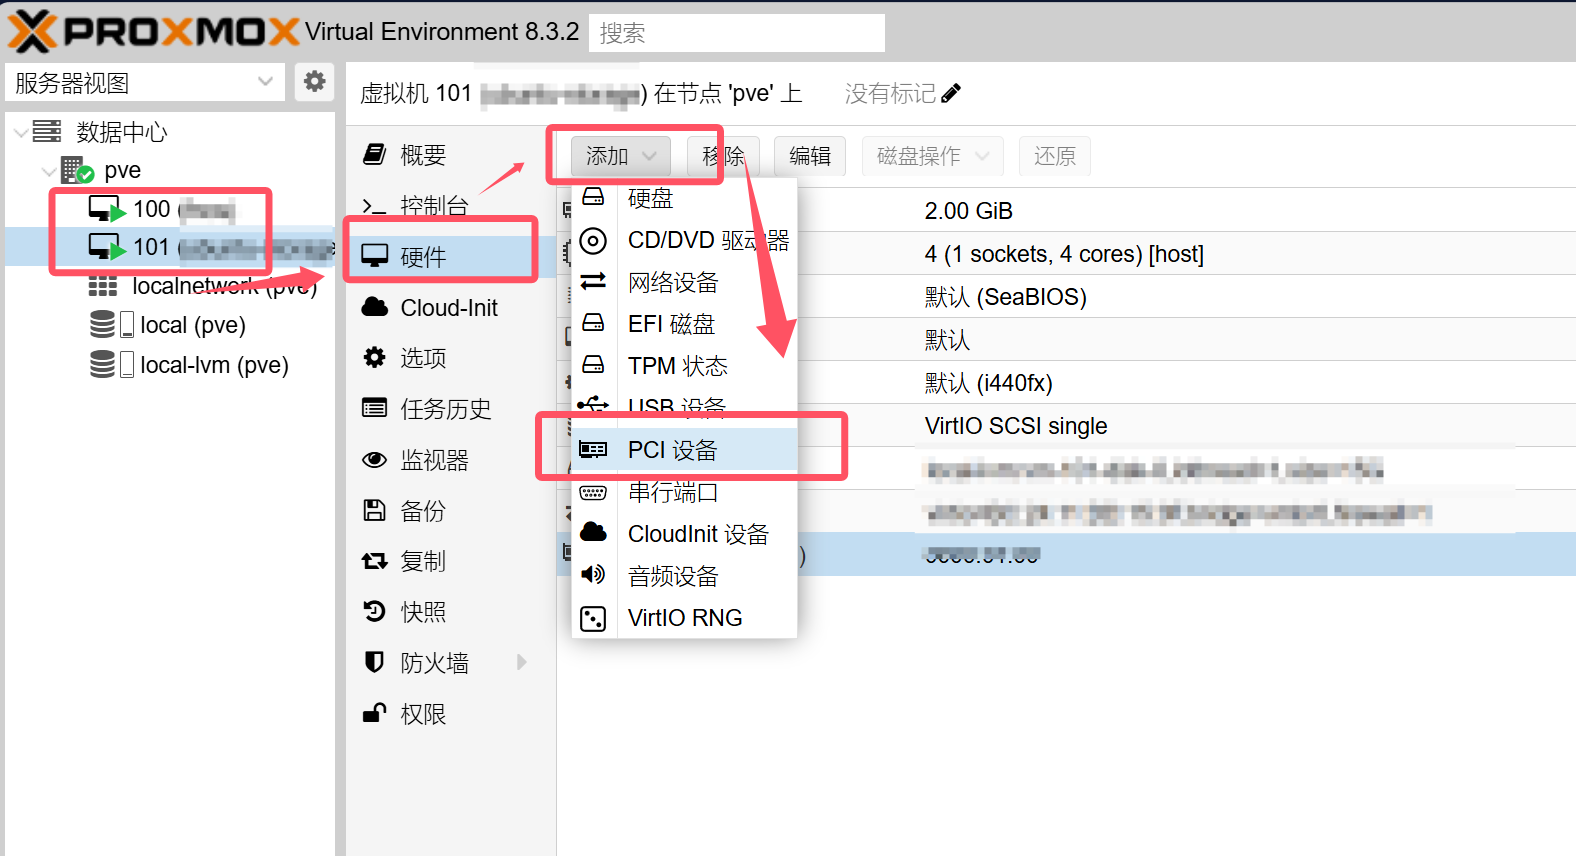
image-20250108211143701

Linux磁盘加密

首先使用fdisk对硬盘进行分区[10]

1
sudo fdisk /dev/sdX
1
2
3
4
5
6
7
8
9
10
11
12
13
14
15
16
17
18
19
20
21
22
23
24
25
26
27
28
29
30
31
32
33
34
35
36
37
38
39
40
41
42
43
44
45
46
47
48
49
50
51
52
53
54
55
56
57
58
59
60
61
62
63
64
65
66
67
68
69
70
71
Welcome to fdisk (util-linux 2.39.3).
Changes will remain in memory only, until you decide to write them.
Be careful before using the write command.


Command (m for help): m

Help:

GPT
M enter protective/hybrid MBR

Generic
d delete a partition
F list free unpartitioned space
l list known partition types
n add a new partition
p print the partition table
t change a partition type
v verify the partition table
i print information about a partition

Misc
m print this menu
x extra functionality (experts only)

Script
I load disk layout from sfdisk script file
O dump disk layout to sfdisk script file

Save & Exit
w write table to disk and exit
q quit without saving changes

Create a new label
g create a new empty GPT partition table
G create a new empty SGI (IRIX) partition table
o create a new empty MBR (DOS) partition table
s create a new empty Sun partition table


Command (m for help): n
Partition number (1-128, default 1):
First sector (34-23437770718, default 2048):
Last sector, +/-sectors or +/-size{K,M,G,T,P} (2048-23437770718, default 23437768703): +4T

Created a new partition 1 of type 'Linux filesystem' and of size 4 TiB.
Partition #1 contains a LVM2_member signature.

Do you want to remove the signature? [Y]es/[N]o: y

The signature will be removed by a write command.

Command (m for help): n
Partition number (2-128, default 2):
First sector (8589936640-23437770718, default 8589936640):
Last sector, +/-sectors or +/-size{K,M,G,T,P} (8589936640-23437770718, default 23437768703): +4T

Created a new partition 2 of type 'Linux filesystem' and of size 4 TiB.

Command (m for help): n
Partition number (3-128, default 3):
First sector (17179871232-23437770718, default 17179871232):
Last sector, +/-sectors or +/-size{K,M,G,T,P} (17179871232-23437770718, default 23437768703):

Created a new partition 3 of type 'Linux filesystem' and of size 2.9 TiB.

Command (m for help): w
The partition table has been altered.
Calling ioctl() to re-read partition table.
Syncing disks.

然后根据教程对分区进行加密[11][12]

1
2
3
4
5
6
7
8
# 全程root操作
dd if=/dev/urandom of=/etc/cryptfs.key bs=1k count=4
cryptsetup luksFormat /dev/sda1 /etc/cryptfs.key
# 然后需要输入大写的YES
# 打开加密的分区
cryptsetup open /dev/sdc1 sdc1 --key-file=/etc/cryptfs.key
# 在打开的分区上创建文件系统
mkfs.ext4 /dev/mapper/sdc1

打开的分区会出现在/dev/mapper

image-20250108220027245

通过更改/etc/crypttab配置文件来实现自动解密,使用分区的UUID来识别分区可以避免因为启动顺序不同造成的问题。

1
2
3
# 先确认分区的UUID
sudo blkid
sudo nano /etc/crypttab
1
2
# <target name> <source device>                            <key file>      <options>
sdc1 UUID=<partition uuid> /etc/cryptfs.key

然后更改/etc/fstab来实现自动挂载,因为crypttab已经固定了target name了,所以应该也不需要uuid来挂载了

1
2
# <file system>  <mount point>  <type>  <options>       <dump>  <pass>
/dev/mapper/sdc1 /some/path ext4 defaults 0 0

Linux配置磁盘阵列

组件RAID5阵列需要至少三个硬盘[8][9]

1
sudo mdadm -C /dev/md0 -l 5 -n 3 -x 1 /dev/sda /dev/sdb /dev/sdc /dev/sdd

-x 1表示有一块热备盘,如果没有可以直接去掉

配置mdadm每次重启都能识别到raid阵列,需要更改配置文件:

1
2
3
# 注意需要有写权限
# mdadm --detail --scan --verbose /dev/md0 > /etc/mdadm.conf
mdadm --detail --scan --verbose /dev/md0 >> /etc/mdadm/mdadm.conf

然后根据这个配置文件的提示,还需要运行update-initramfs -u命令

然后就可以创建文件系统格式化,然后挂载了

1
2
sudo mkfs.ext4 /dev/md0
sudo mount /dev/md0 /some/path

如果需要开机自动挂载,需要更改fstab

1
2
# /etc/fstab
/dev/md0 /some/path ext4 defaults 0 0

References


pve安装及配置
http://zr4in.github.io/2025/01/05/pve安装及配置/
作者
zr4in
发布于
2025年1月5日
许可协议